Launching a Stand-alone Executable
Originally Published inA colleague of mine asked for some help implementing a Revit add-in to launch an external stand-alone Windows executable from the Revit user interface.
Since this might be useful to others as well, here is a summary of our discussion and solution:
Question: I am working on a windows application using GBS API to perform building parametric analysis (energy consumption in terms of comparison of window glazing materials, building orientation). Currently, I am exporting the gbxml file, saving it on my desktop and using the gbxml file in GBS simulations.
I would like to know if I can directly export the gbxml file to my windows application and run the simulation by creating a Revit add-in of my windows application.
Answer: I do not understand the difference between the two:
- Exporting the gbxml file, saving it on my desktop and using the gbxml file in GBS simulations.
- Export the gbxml file to my windows application
The only gbxml export option provided by the Revit API is the Export method:
  public bool Export(
    string folder,
    string name,
    GBXMLExportOptions options )
It produces the same result as exporting to gbxml manually.
Response: I have been working on other parts of my sample.
I now want to create an add-in feature in Revit that executes my windows desktop application. Can you help me to identify the code to perform this?
I would like to know what code I am supposed to follow to create a Revit add-in of my .exe file.
Answer: Do you mean you want to launch a stand-alone Windows executable from your C# .NET add-in?
The answer is provided immediately by a standard Internet search, e.g. for c# launch exe ↗.
You cannot create a Revit add-in from an exe file.
You can however easily launch an external executable from a Revit add-in.
Response: If it does not take too much of your time it would be great if you could write it for me.
I do have Visual Studio installed.
Thank you for your help.
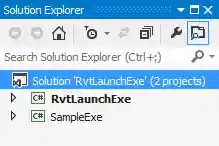
Answer: Here is RvtLaunchExe.zip containing the complete source code, Visual Studio solution, and add-in manifest.
It also includes a sample executable:
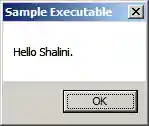
The sample exe just displays a dialogue box:
Its entire implementation looks like this:
  using System;
  using System.Windows.Forms;

  namespace SampleExe
  {
    class Program
    {
      static void Main( string[] args )
      {
        MessageBox.Show( "Hello Shalini.",
          "Sample Executable" );
      }
    }
  }
If you open the Visual Studio solution and compile, the whole thing should install itself, i.e. copy the add-in manifest and assembly DLL to the proper location for Revit to find and load them.
Revit will then display the add-in ribbon panel:
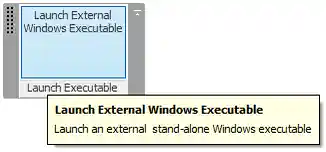
Simply click the button to do the dirty deed.
The external application defines the ribbon panel and command button like this:
#region Namespaces
using System;
using System.Collections.Generic;
using Autodesk.Revit.ApplicationServices;
using Autodesk.Revit.Attributes;
using Autodesk.Revit.DB;
using Autodesk.Revit.UI;
using System.Reflection;
#endregion

namespace RvtLaunchExe
{
  class App : IExternalApplication
  {
    /// <summary>
    /// Add our command button to the ribbon panel.
    /// </summary>
    void PopulatePanel( RibbonPanel p )
    {
      string path = Assembly.GetExecutingAssembly()
        .Location;

      RibbonItemData rid = new PushButtonData(
          "RvtLaunchExe_Command",
          "Launch External\r\nWindows Executable",
          path, "RvtLaunchExe.Command" );

      rid.ToolTip = "Launch an external "
        + " stand-alone Windows executable";

      p.AddItem( rid );
    }

    public Result OnStartup( UIControlledApplication a )
    {
      PopulatePanel(
        a.CreateRibbonPanel(
          "Launch Executable" ) );

      return Result.Succeeded;
    }

    public Result OnShutdown( UIControlledApplication a )
    {
      return Result.Succeeded;
    }
  }
}
Clicking the button launches the external command. It calls the LaunchExe method, which simply uses the .NET System.Diagnostics process functionality to launch the external executable:
#region Namespaces
using System;
using System.Diagnostics;
using System.IO;
using Autodesk.Revit.Attributes;
using Autodesk.Revit.DB;
using Autodesk.Revit.UI;
#endregion

namespace RvtLaunchExe
{
  [Transaction( TransactionMode.ReadOnly )]
  public class Command : IExternalCommand
  {
    const string _standalone_exe_path
      = "C:/a/vs/RvtLaunchExe/SampleExe/bin/Debug/SampleExe.exe";

    int LaunchExe( string path )
    {
      if( !File.Exists( path ) )
      {
        throw ( new ArgumentException( string.Format(
          "'{0}' not found.", path ) ) );
      }

      int rc = 0;

      // Prepare the process to run

      ProcessStartInfo start = new ProcessStartInfo();

      // Enter the command line arguments, everything
      // you would enter after the executable name.

      //start.Arguments = arguments;

      // Enter the complete executable path

      start.FileName = path;

      // Do you want to show a console window?

      start.WindowStyle = ProcessWindowStyle.Hidden;
      start.CreateNoWindow = true;

      // Run the external process and
      // wait for it to finish

      using( Process proc = Process.Start( start ) )
      {
        proc.WaitForExit();

        // Retrieve the external application exit code

        rc = proc.ExitCode;
      }
      return rc;
    }

    public Result Execute(
      ExternalCommandData commandData,
      ref string message,
      ElementSet elements )
    {
      int rc = LaunchExe( _standalone_exe_path );

      if( 0 != rc )
      {
        message = string.Format(
          "{0} returned error code {1}",
          _standalone_exe_path, rc );

        return Result.Failed;
      }
      return Result.Succeeded;
    }
  }
}
I hope this covers all you need and is useful to others as well.
After all, it does provide a really minimal example of setting up one single ribbon button and one single trivial external command with an absolute minimum of fuss and effort.