Ribbon Creation Utility
Originally Published inCreating and populating a ribbon panel is not a very complicated matter, although it normally does require instantiating and manipulating quite a number of different cooperating class instances.
Now Victor Chekalin, or Виктор Чекалин, presents a much simpler solution for this using dedicated wrapper classes.
In his own words:
Create Buttons without Effort
As you know, you can create your own buttons or even your own tab in the Revit ribbon to perform a command.
For me, creating button always wasn’t easy. Especially I didn’t like to pass the assembly location and name of the external Command class to perform when I click the button. Also, the standard API requires me to create an ImageSource for each button image while I have an image stored in the assembly resources.
To avoid these troubles and ease my life I decided to create a utility which helps me to create my Revit ribbon buttons. The utility I created is really useful for me and I want to share it with everybody.
Here are the main features:
- Fluent interface: You can create all your buttons in one single line of code.
- Command name as generic parameter: You don’t need to write the command name as text and set the assembly location.
- Images from resource: You can easily use images from resources.
The sample below illustrates all this.
This is the result in the Revit ribbon:
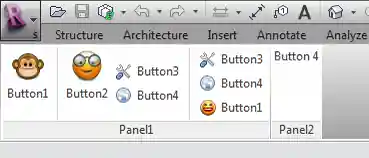
Look at the source code generating it:
  Ribbon ribbon = new Ribbon( a );

  ribbon.Tab( "MyTab" )
    .Panel( "Panel1" )

    .CreateButton( "btn1", "Button1",
      typeof( Command1 ),
      btn => btn
        .SetLargeImage(
          Resources._1348119708_face_monkey_32 )
        .SetSmallImage(
          Resources._1348119708_face_monkey_16 ) )

    .CreateSeparator()

    .CreateButton<Command2>( "btn2", "Button2",
      btn => btn
        .SetLongDescription(
          "This is a description of the button2" )
        .SetLargeImage(
          Resources._1348119643_face_glasses_32 ) )

    .CreateStackedItems( si => si

      .CreateButton<Command3>( "btn3", "Button3",
        btn => btn.SetSmallImage( Resources
          ._1348119594_preferences_system_16 ) )

      .CreateButton<Command4>( "btn4", "Button4",
        btn => btn.SetSmallImage( Resources
          ._1348119621_internet_web_browser_16 ) ) )

    .CreateSeparator()

    .CreateStackedItems( si => si

      .CreateButton<Command3>( "btn3_1", "Button3",
        btn => btn.SetSmallImage( Resources
          ._1348119594_preferences_system_16 ) )

      .CreateButton<Command4>( "btn4_1", "Button4",
        btn => btn.SetSmallImage( Resources
          ._1348119621_internet_web_browser_16 ) )

      .CreateButton<Command1>( "btn1_1", "Button1",
        btn => btn.SetSmallImage( Resources
          ._1348119553_face_smile_big_16 ) ) );
Pretty easy, isn’t it?
At first I set the tab, where I want to create my buttons. I can specify my own tab or one of the system tabs, e.g. Autodesk.Revit.UI.Tab.AddIns. If the tab doesn’t exist, it will be created. So, you can easily use a tab from a different add-in. You specify a panel to group the buttons on the tab. Next, the most important part, create the buttons. I won’t describe how to create the buttons. The code is self-explanatory.
My utility currently supports push button, push button as stacked item and separator.
Here is the compiled assembly.
The source code is available on GitHub ↗. You can also download it as a zip archive file ↗.
It provides the namespaces VCRevitRibbonUtil and VCRevitRibbonUtil.Helpers containing the following classes:
- StackedItem
- Button
- Panel
- Ribbon
- Tab
- Helpers.BitmapSourceConverter
Many thanks to Victor for this neat time and labour saving utility!